Showing posts with label Versafine Onyx. Show all posts

Tuesday, April 13, 2021

Bees Tag


This is a tag that I made using two different stencils and stamped with bees (Stampin' Up!). I used Distress Oxide Inks and, for the bees, Versafine Onyx ink. I used fabric as the fiber to put through the hole at the top.

I'm sharing this with:

Simon Says: Not A Card 

Tag Tuesday: Bees  

Just Us Girls Challenge #579 - Trend Week  


Ch#92 Anything Goes (option Kites) 


Sunday, April 11, 2021

Hello 2

I began this 4 1/2" square card by cutting a 4 1/4" panel of the rosy-colored scrapbook paper. Then, I cut the four squares to lie on top of it. Next, I cut the square for the top and adhered it with double-sided foam tape. I stamped a bee (Stampin' Up!) on it with Versafine Onyx ink and die cut the sentiment in white twice to stack them for stability and dimension, a la Jennifer McGuire.

I'm sharing this with:

Simon Says Stamp Monday Challenge 
 

Laugh


I began this A2-sized card by cutting the flowered panel and adhering to the front of the card using double-sided tape. Then, I die cut the sentiment twice a la Jennifer McGuire to add stability and dimension. I glued it down. After that, I stamped the bees (Stampin' Up!) with Versafine Onyx ink.

I'm sharing this with:

Fusion Card Challenge 


hello


I began this by cutting the red panel to fit within the A2-sized white card base. Then, I cut the flowered scrapbook paper. Next, I die cut two of the white sentiments and glued them together a la Jennifer McGuire to give them more stability and dimension. Finally, I stamped the bee (Stampin' Up!) using Versafine Onyx ink.

I'm sharing this with:

Simon Says Stamp Monday Challenge 

Fusion Card Challenge 


Friday, February 12, 2021

Pattern with Key


This is a mini slim line card measuring 3 1/2" by 6". I began by stamping the image (Stampers Anonymous) using Versafine Onyx on white card stock. Then, I mounted that onto black card stock and onto purple card stock using double-sided tape. Next, I glued a tiny brass key to the white panel.

I'm sharing this with:

Challenge #190 - Pattern


Monday, February 8, 2021

XOXOXO


This tiny card measures approximately 3" by 3 1/2". I began by stamping the "XO" background (Stampin' Up!) on light pink card stock using Colorbox Chalk in warm red. Then, I stamped the large "XOXOXO" (Stamp Craft) across the front using Versafine Onyx. I adhered the pink panel to the red card base with double-sided tape.

I'm sharing this with:

Inspired By...krafty love  

Just Us Girls Challenge #570 - Word Week  


Simon Says: Love Is In The Air 

Happy Valentine's Day


This small card measures 4" square. I began by stamping the banner at the top with Colorbox Chalk in warm red on a light pink card stock. Then, I stamped the flamingos. Next, I stamped the sentiment on red card stock using Versafine Onyx, which I glued to the pink panel. Finally, I adhered the pink panel to the red card base using double-sided tape. All stamps are Stampin' Up!.

I'm sharing this with:

Inspired By...krafty love 

Just Us Girls Challenge #570 - Word Week  


Simon Says: Love Is In The Air 

Be Mine


 This little card measures approximately 3 3/4" by 4 1/4". I first stamped the "XO" background (Stampin' Up!) on light pink card stock with Colorbox Chalk ink and cut it out using a heart die. Then, I stamped the banner (also Stampin' Up!) on red card stock using Versafine Onyx. Next, I stamped the sentiment (Stampin' Up!) across the banner. I glued that to the heart shape. After that, I adhered the heart and banner to the black card blank lifting it up with double-sided foam tape. Finally, I stamped the sentiment (also Stampin' Up!) across the bottom of the card.

I'm sharing this with:

Inspired By...krafty love 

Just Us Girls Challenge #570 - Word Week  


Simon Says: Love Is In The Air 

P.S. My shoulders, neck and back are still giving me some grief, but I was gentle with myself and made 3 Valentine's Day cards. I will try again tomorrow, too.

Sunday, January 31, 2021

Someday


I began this A2-sized card by stamping the focal image (Stampington & Company) in Versafine Onyx on mixed media paper. Then, I stamped the squares and circles (Hero Arts) and the word Someday (Uptown Design Co.) using Distress Oxide inks. After that, I adhered the white panel to the magenta panel and then to the black panel using double-side tape. I adhered all of that to a white card base.

I'm sharing this with:

Simon Says: Let’s Be On Time 

Saturday, January 23, 2021

Childhood is a Journey


 I began this A2-sized card by cutting a piece of white card stock for the top. I stamped the sentiment (Momenta) using Colorbox Chalk lipstick red and the tricycle (Unity) using Versafine Onyx. Then, I cut a piece of red card stock, which was slightly larger and adhered the two pieces together. Next, I adhered that onto the white card base.

I'm sharing this with:

Simon Says: We’re On A Roll

Big Ben: London

I began this tag by stamping the clock (Inkadinkado) and Big Ben (Stampabilities) on scraps of white card stock with Versafine Onyx. I cut down the Big Ben image and colored it in with my Spectrum Noir colored pencils. Then, I die cut the tag which measures approximately 2 1/2" by 4 1/2". Next, I cut strips of white and red card stock and glued it to the tag. Then, I glued the clock face to the tag. After that, I used double-sided foam tape to adhere the other image to the tag. Then, I used my Silent Setter to bore a hole into the top middle of tag. I set in an eyelet and threaded a white ribbon through it.

I'm sharing this with: 

Simon Says: We’re On A Roll 
 

Circles All Over


I began this tag by die cutting the black background. It measures approximately 3" by 3 1/4". Then, I stamped the image (Above the Mark) on a scrap of white card stock using Versafine Onyx. I glued that to the background. Next, I bored holes into the two top corners with my Silent Setter and set black eyelets into the holes. After that, I pushed through a white ribbon and tied it off.

I'm sharing this with:

Simon Says: We’re On A Roll  

Tuesday, January 19, 2021

"Earth Laughs in Flowers."


I began this A2-sized card by stamping the floral images (Magenta) with Versafine Onyx ink on a white card stock panel. Then, I colored the flowers using a blue chalk and the "stems" with green. Next, I stamped the sentiment (Great Impressions) using Vivid vintage green. Finally, I adhered the panel to a greenish card base with double-sided tape.

I'm sharing this with:

Inspired by...everything is a-bouquet  


Monday, January 18, 2021

Ostrich Races

This stamp cracks me up every time I use it!


I began this A2-sized card by stamping the ostriches (Mostly Animals) on a manila-colored card stock with Versafine Onyx. Then, I adhered that to a black piece of card stock to frame the image. Next, I cut the patterned scrapbook paper slightly smaller than the red card base and used double-sided tape to adhere the two together. Finally, I die cut the sentiment out of black card stock and glued it below the ostriches, because they make me laugh!

I'm sharing this with:

Modsquad - Fly Away 

The House That Stamps Built - Anything Goes Challenge ~ J1321

Simon Says: Layer It Up 

HLS January Anything Goes with Dies Challenge  

Woodcut birds


 I began this A2-sized card by stamping the woodcut-type birds (Inkadinkado) on the yellow gingham scrapbook paper with Versafine Onyx. Then, I cut black card stock slightly smaller than the manila-colored card base and adhered the two using double-sided tape. Next, I cut the floral and black scrapbook paper slightly smaller than the black card stock and adhered it. After that, I adhered the yellow gingham on top. That makes four layers.

I'm sharing this with:

Modsquad - Fly Away

The House That Stamps Built - Anything Goes Challenge ~ J1321

Simon Says: Layer It Up 


Saturday, January 16, 2021

Cupcake 2


Except for the ribbon, this is a one-layer A2-sized card. I began by stamping the cupcake and the sentiment on a white card base using Versafine Onyx. I colored the cupcake with my Spectrum Noir colored pencils. I cut slits down either side with my X-acto knife and threaded the ribbon through. I also cut a slit near the fold and brought the thread to the inside of the card. I taped it down with double-sided tape.

I'm sharing this with:

Double D 5th Anniversary/Birthday Cupcakes Challenge  


CAS Colours & Sketches - Challenge # 402 - Sketch 


Casology - Week 381: MEMORIES  


Cupcake 1


I began this card by stamping the cupcake (Inkadinkado) on a piece of white card stock with Versafine Onyx, and I cut it out with scissors. I colored it using my Spectrum Noir colored pencils. Then, I cut a piece of magenta card stock slightly smaller than the A2-sized card base. I ran it through by Big Shot with an embossing folder to create a textured surface. I adhered that to the card base with double-sided tape. Next, I cut a length of jumbo wide orange rick-rack and glued it to the magenta panel. After that, I glued the cupcake cut-out to the rick-rack. Finally, I used yellow Stickles to simulate a flame for the candle.

I'm sharing this with:

Double D 5th Anniversary/Birthday Cupcakes Challenge  


CAS Colours and Sketches - Challenge # 402 - Sketch 


Thursday, January 14, 2021

You Are Enough


I began this card by embossing the green panel. Then, I adhered it to the A2-sized card base. Next, I stamped the sentiment (Stampers Anonymous) on light pink paper with Versafine Onyx, and using my MISTI, lined it up to make sure it was straight. After that, I used my paper trimmer to cut it down to size.

I'm sharing this with:

TFJB - Put A Good Word In  

Try it on Tuesday - Uplifting or Positive Quote 

The Sisterhood of Crafters - Die Cuts and/or Embossing Folders  

Think Spring

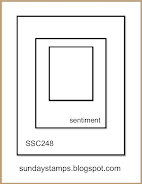
I began by cutting the panels, then I adhered them to the A2-sized card base. The smallest panel is a 2 1/2" square. Next, I stamped the sentiment (Penny Black) with Versafine Onyx.

I'm sharing this with:

SSC248 In the Center


Country View Challenge - January 2021 - Squares

Pen Nibs


 This is a simple A2-size card. I began by stamping the image (Limited Edition Rubberstamps) using Versafine Onyx on the yellow patterned scrapbook paper after I cut it down. Then, I adhered the panel to the card base using double-sided tape.

I'm sharing this with:

SSC248 In the Center