Friday, December 25, 2020

Au Revoir


This is the last challenge for A Vintage Journey, so we are saying goodbye. This is the last ATC I am making for this challenge.

I'm sharing this with:

A Vintage Journey - Merry Little Christmas 

Thursday, December 24, 2020

Christmas Tree

This is an ATC (Artist Trading Card), and, as such, it measures 2 1/2" by 3 1/2". I started with a piece of cardboard. I stamped the tree (All Night Media) using Distress Oxide ink. Then, I decorated it using Smooch media. The bulbs are white, and the garland is gold. Next, I glued a tiny star button to the top. After that, I stamped the sentiment (unknown). Finally, I distressed the edges with my scissors.

I'm sharing this with:

A Vintage Journey - Merry Little Christmas 

Country View Challenge - December 2020 - Anything Christmas 
 

Merry Christmas


 This is an ATC (Artist Trading Card), and, as such, it measures 2 1/2" by 3 1/2". I began with a sturdy substrate and used a glue stick to apply the snowflake-y scrapbook paper. I die cut the white panel and adhered it to the base. Then, I die cut the trees and glued them down. Next, I stamped the sentiment (unknown) using Versafine Onyx ink. Finally, I glued down some silver gems.

I'm sharing this with:

A Vintage Journey - Merry Little Christmas 

December 2020 - Anything Christmas

Wednesday, December 23, 2020

Winter Trees


 I began this A2-sized card with a white base. I adhered a die cut shape using some scrapbook paper with snowflakes on it with double-sided tape. Next, I glued 3 sizes and colors of die cut trees. Finally, I added a silver gem to sparkle.

I'm sharing this with:

#TGIFC295 Inspiration Challenge 


Simon Says: Sparkle and Shine 

Christmas Trees


 I began this A2-sized card with a white base. Then, I added a piece of snowflake scrapbook paper as a background. Next, I die cut the white panel and adhered it using double-sided tape. After that, I die cut the trees and glued them to the white panel. Finally, I added silver gems to the white panel. I'll probably use this as a thank-you card.

I'm sharing this with:

#TGIFC295 Inspiration Challenge 


Simon Says: Sparkle and Shine 

Saturday, December 19, 2020

Cheers


I began this A2-sized card by die cutting the letters and numbers out of black card stock. I glued them to the bottom of the card. Then, I cut the martini scrapbook paper and adhered it to the top two thirds of the card leaving a slight strip of the card showing at the top. Inside the card is "Happy New Year". We've had enough of 2020, haven't we?

I'm sharing this with:

Simon Says: Ice Cold (from what I understand, in order to be good, a martini must be ice cold!)

More than words on Facebook: https://www.facebook.com/morethanwordschallenges 

Christmas Wishes


 I began this A2-sized card by cutting a panel at 4 1/2" by 3 7/8". I stamped the image (Stampin' Up!) using Versamark embossing ink and embossed the image in gold. Then, I stamped the sentiment (also by Stampin' Up!) in Versafine Onyx ink. I glued it onto a some gold card stock and cut it down to make a frame around the sentiment. I glued that to the panel. Next, I used double-sided tape to adhere a 5 1/4" by 3 1/2" piece of gold card stock to the card base. Finally, I adhered the panel to the gold card stock.

I'm sharing this with:

Freshly Made Sketches #466


Simon Says: Christmas Critters 

Country View Challenges - December 2020 - Anything Christmas

Friday, December 18, 2020

Winter Wonderland 2


 I began this small tag/ornament by stamping the image (Inkadinkado) in Versafine Onyx on white card stock. The image says "Winter Wonderland" and has an image of a snowflake. I used double-sided foam tape to adhere it to the black die cut banner. Then, I die cut another banner out of white card stock. I lay the two together and hand punched a small circle. Next, I threaded a ribbon through both holes and knotted it.

I'm sharing this with:

Simon Says: Ice Cold

LTSCB #140 - Winter Wonderland  

LTCCB #53 - December Anything Goes 

Challenges # 65 - Schneeflocken / snowflakes  

Winter Wonderland 1


 I began this small tag/ornament by stamping the image (Inkadinkado), which says "Winter Wonderland" on it and has an image of a snowflake, on a frosted pale blue card stock. I used Versafine Onyx to make the impression. I die cut that in the form of a banner. Then, I cut another banner out of black card stock and adhered the blue panel to it. Next, I used my Silent Setter to punch out holes and fill them with eyelets in three places - two for the silver tinsel hanger and one for the dangling snowflake charm.

I'm sharing this with:

Simon Says: Ice Cold

LTSCB #140 - Winter Wonderland 

LTCCB #53 - December Anything Goes

Challenges # 65 - Schneeflocken / snowflakes  

Thursday, December 17, 2020

Snowflakes


I began this A2-sized card by stamping the snowflakes (A Stamp in the Hand) on white card stock using Vivid inky blue. I rounded the corners and adhered it to the navy panel with double-sided tape. Then, I glued on the felt snowflake. I adhered the navy panel to a white card base.

I'm sharing this with:

Simon Says: Ice Cold 

Country View Challenges - December 2020 - Anything Christmas  

LTSCB #140 - Winter Wonderland  

Challenges # 65 - Schneeflocken / snowflakes  

Wednesday, December 16, 2020

Thank You 2


This card fits in a regular stationery envelope...not the big #10, but the other smaller one. I began with a white card base. Then, I cut a panel out of the holly paper just slightly smaller than 6" by 3 1/4". The next panel is glittery red with white. I cut it even smaller. The last panel, which is dark green, is where I embossed the sentiment (Stampin' Up!) in white embossing powder. I glued it into place.

I'm sharing this with:

#TGIFC294 Sketch Challenge


Stay Crafty with Hero Challenge #17 - Thank You Cards 

Thank you 1


 I began this A2-sized card by stamping the "snow" (A Stamp in the Hand) on the white panel using Vivid inky blue. I glued the die cut tree to the lower right corner and rounded the edges with a hand punch. Then, I stamped the sentiment (Stampin' Up!) with Versamark and heat embossed it on navy blue card stock using white embossing powder. I arranged those two panels on a red piece of card stock and, using double-sided tape, adhered that to the striped scrapbook paper.

I'm sharing this with:

Fab Friday 203


Stay Crafty with Hero Challenge #17 - Thank You Cards

Papercraft Challenges # 65 - Schneeflocken / snowflakes  

Monday, December 14, 2020

Happy Holidays


I began this A2-sized card by cutting a piece of white card stock measuring just under 5 1/2" by 4 1/4" to allow the navy border to show. Then, I used Distress Oxide ink and a stencil making a gradation from dark blue to light. Next, I die cut two cardinals to put in the trees. Finally, I stamped the sentiment (Hampton Art) in the lower right hand corner using Colorbox Chalk in warm red.

I'm sharing this with:

Country View Challenges - December 2020 - Anything Christmas 

Make My Monday - #137 Christmas Theme Card  

The Sisterhood of Crafters - ANYTHING GOES CHRISTMAS / WINTER

Simon Says: Ice Cold 

LTSCB #140 - Winter Wonderland

LTCCB #53 - December Anything Goes  

December's Creative Challenge - Christmas

Sunday, December 13, 2020

Rainbow Ornament


I began this A2-sized card by die cutting a rainbow of colors using a die that looks like tufts of grass. Then, I die cut a circle. I glued each color down until I got to the red, where I used 3 rows of that color. Next, I cut a piece of silver to be used as the cap. Finally, I made the hanging "string" using a white colored pencil and glued the ornament in place.

I'm sharing this with:

Challenge #24: Holiday Rainbow  (Honorable Mention!)


Country View Challenges - December 2020 - Anything Christmas  

Alphabet Challenge - R is for Rainbow (Top 3 winner!)

Make My Monday - #137 Christmas Theme Card 

Saturday, December 12, 2020

Peace


 I began this A2-sized card by stamping the "snow" (A Stamp in the Hand) and the sentiment (PSX) using Vivid ink. Then, I die cut the tree and glued it to the card base.

This was a rework of a previous sketch # 392 for CAS Colours & Sketches. We were to give it a seasonal look this time around. (See below.)

I'm sharing this with:

Challenge #400 - A Clean and Simple Seasonal Challenge, and Celebrating a Milestone!


Country View Challenge - December 2020 - Anything Christmas  

Simon Says: Favorite Technique (die cutting)

Simon Says: Let It Snow

LTSCB #140 - Winter Wonderland  

LTCCB #53 - December Anything Goes 

December's Creative Challenge - Christmas  

Holiday Card


 I began this A2-sized card by cutting the dark green background slightly less than the size of the white card stock base. I adhered it to the base with double-sided tape. Then, I cut the strips 1" wide in graduated lengths to make the design. I adhered them to the background with double-sided tape. Finally, I die cut a bow to glue to the middle strip, as if it were a present to be opened.

I reworked sketch #398 to comply with CAS Colors and Sketches requirements for challenge #400. (See below.)

I'm sharing this with:

Country View Challenges - December 2020 - Anything Christmas 

Simon Says: Favorite Technique (die cutting)

Challenge #400 - A Clean and Simple Seasonal Challenge, and Celebrating a Milestone! 


Friday, December 11, 2020

Merry, Merry


 I began this A2-sized card by cutting the green panel to cover the entire card base. Then, I cut the patterned paper so that it was 2" by 5 1/2" and adhered it to the top part of the card using double-sided tape. Next, I cut the sentiment from an all-over print scrapbook paper and glued it to the green panel. 

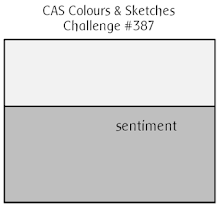
The challenge was to use any sketch, color combination or both from 2020 and make it into a holiday card. I chose Challenge #387 (see below).

I'm sharing this with:

Challenge #400 - A Clean and Simple Seasonal Challenge, and Celebrating a Milestone! 


Country View Challenges - December 2020 - Anything Christmas

Angel


To begin this tag, I die cut the green base, the child's face and the wings. I punched out the scalloped circle from a green that was a shade or two darker than the background. Then, I stamped the music background (Stampington & Co.) with Versafine Onyx. Next, I assembled the elements and used glue to adhere them. Finally, I punched holes and filled them with eyelets and threaded a length of small tinsel through them as a hanger for the tag.

I'm sharing this with:

Tag Tuesday - Christmas or anything goes 

Simon Says: Favorite Technique (die cutting)

Country View Challenges - December 2020 - Anything Christmas 

The Sisterhood of Crafters - ANYTHING GOES CHRISTMAS / WINTER 

Thursday, December 10, 2020

Peace


 I began this tag by die cutting the white panel out of card stock. I also die cut the snowflakes and the base panel out of a navy card stock. Then, I stamped the circle sentiment (Hampton Art) with Vivid inky blue on the corner of the white panel allowing some of it to be off the edge. Next, I arranged the snowflakes and glued them to the white panel. Finally, I punched a hole at the top of the tag and threaded a sheer white ribbon into it. I used a thin white ribbon to tie it off.

I'm sharing this with:

Tag Tuesday - Christmas or anything goes 

Simon Says: Favorite Technique (die cutting)

Country View Challenges - December 2020 - Anything Christmas

Happy Holidays Tag

I began this tag by die cutting the white panel of card stock. I also cut the green panel using my paper trimmer. Then, I stamped the wreath (Stampa Rosa) using Vivid ink in vintage green. Next, I used a hand hole punch and red paper to make the little "berries" and glued them to the wreath. After that, I stamped the sentiment (Hampton Art) in Colorbox Chalk warm red. Finally, I used a larger hole punch to make a hole in the top of the tag and threaded in a piece of ribbon and tied it in a knot.

I'm sharing this with:

Tag Tuesday - Christmas or anything goes  

Simon Says: Favorite Technique (die cutting)

Country View Challenges - December 2020 - Anything Christmas  

The Sisterhood of Crafters - ANYTHING GOES CHRISTMAS / WINTER 

December's Creative Challenge - Christmas  
 

Wednesday, December 9, 2020

Peace


I began this A2-sized card by die cutting the trees in two different colors of green. Then, I cut a bit of the blue and white paper and hand punched the edge to make it look like snowy hills. I adhered that to a white card base using double-sided tape. Next, I glued the trees to the card. Finally, I stamped the sentiment (PSX) using Vivid ink.

I'm sharing this with:

CAS(E) this Sketch #400 


Country View Challenges - December 2020 - Anything Christmas 

Tuesday, December 8, 2020

Happy Holidays


 I began this A2-sized card by cutting the dark green strips and gluing them down. Then, I stamped the sentiment (Hampton Art) using Colorbox Chalk warm red. After that, I used a punch and cut out several holiday "packages" and glued them to the left side top of the card.

I'm sharing this with:

CAS(E) this Sketch #400 


Country View Challenges - December 2020 - Anything Christmas  

Make My Monday - #137 Christmas Theme Card

Monday, December 7, 2020

For Susan: Happy Birthday to You!


 Happy Birthday, Susan!


I'm sharing in the showering of cards for Susan's 70th birthday: Happy Birthday, Susan!

Sunday, December 6, 2020

Merry Christmas


 I began this A2-sized card by cutting out the background, which is slightly smaller than 5 1/2" by 4 1/4". Then, I cut out the boxes and the sentiment. I cut the two lines of the sentiment from scrapbook paper with an all-over design. I adhered the larger box with double-sided tape. The bow was adhered the same way. The smaller box was wrapped with cording and tied. It was adhered using small foam squares. I glued the sentiment onto the background panel.

I'm sharing this with:

Freshly Made Sketches - Sketch #464 


Int'l Art and Soul - Ch#98 Anything Goes with a Bow 

Country View Challenges - December 2020 - Anything Christmas

Saturday, December 5, 2020

Happy Holidays


 I began this A2-sized card by cutting the burgundy panel just slightly smaller than 5 1/2" by 4 1/4" so the cream-colored card base could be seen. Then, I cut both wreath shapes using dies, one out of kraft and the other out of cream. I wove them together to make a pleasing arrangement. I glued that to the burgundy panel. Next, I die cut a red bow. Finally, I stamped the sentiment (Hampton Art) at the bottom with Versafine Onyx.

I'm sharing this with:

Color Throwdown #622 


Simon Says: Fun With Dies 

Country View Challenges - December 2020 - Anything Christmas

Festive Little Bird


 This little bird card measures about 3 3/4" by 4 1/2". It would fit in an envelope sized for an A2 card. I began by die cutting two bird shapes. I embossed one with the coordinating folder. I rubbed a Vivid aqua ink pad over the surface, then I glued on the red pom-pom trim. To make it into a card, I glued the tail to the second bird shape I had cut and scored it to make a hinge.

I'm sharing this with:

The Sisterhood of Crafters - SHAPED PROJECTS 

Simon Says: Fun With Dies 

Country View Challenges - December 2020 - Anything Christmas

Friday, December 4, 2020

Pink Poinsettias


 I began this A2-sized card by die cutting the poinsettia elements. I assembled them and glued them to each other and then to the card base as seen. On top of each, I placed an AB clear gem stone. The pink of the poinsettias draw out the pink in the gem stone. I used two colors of pink and a cream-colored card base.

I'm sharing this with:

International Art and Soul - Ch#97 Let us see Lots of Pink in December

Simon Says: Fun With Dies 

Country View Challenges - December 2020 - Anything Christmas

Happy Holidays


 I began this A2-sized card by die cutting the elements for the poinsettia. I assembled them in this order: kraft, red, burgundy and placed them on top of a cream-colored card stock. Then, I stamped the sentiment (Hampton Art) in the lower right-hand corner with Colorbox Chalk in warm red.

I'm sharing this with:

Color Throwdown #622 


Simon Says: Fun With Dies 

Country View Challenges - December 2020 - Anything Christmas

Wednesday, December 2, 2020

Are We There Yet?


I began this A2-sized card by cutting the plaid background. It's one piece, so I cut it and placed the foreground so it looks like 8 pieces. I adhered that with double-sided tape. Then, I worked on the panel with the sentiment. Isn't that what we all said as kids when we were bored on the way to someplace exciting? Anyway, I stamped the sentiment using Versafine Onyx. I cut out the car and camper by hand and I punched out the circles to create interest on the left of that panel. I wrapped a string around that panel and adhered it to the background with double-sided foam tape.

I'm sharing this with:

Moving Along with the Times - Challenge 125 for December 

A Trio of Tags


 Each tag measures about 4 1/2" by 2 1/2". I began by die cutting the banner shapes. Then, I stamped the french words (Stampabilities) with Versafine Onyx on them. Next, I die cut the children's faces from a Finnabair collection of photo stickers. After that, I die cut a circle of music to go behind them. Then, I die cut and embossed the wings from a Tim Holtz/Sizzix product out of silver paper. Then, I set eyelets in the upper corners and in the middle bottom. In the top eyelets, I strung some lengths of tinsel, and in the bottom eyelet, I linked the charms that say Live, Trust and Love. Below are photos of the individual tags showing more detail. 

(Inspiration piece by Nancy Maxwell James: http://frame.bloglovin.com/?post=7767517315&blog=3441374&frame_type=none)


I'm sharing this with:

A Vintage Journey - Pairs, Trios and Sets

Simon Says: Fun With Dies 

Tag Tuesday - Christmas or anything goes 

Country View Challenges - December 2020 - Anything Christmas  

LTCCB #53 - December Anything Goes